Detailed Table of Contents
Guidance for the item(s) below:
Let's learn about a few more Git techniques, starting with branching. Although these techniques are not really needed for the iP, we require you to use them in the iP so that you have more time to practice them before they are really needed in the tP.
See Git-Mastery → Tour 6: Branching Locally
See Git-Mastery → Tour 7: Keeping Branches in Sync
See Git-Mastery → Tour 8: Working with Remote Branches
Guidance for the item(s) below:
Let's learn how to create a pull request (PRs) on GitHub; you need to create one for your project this week.
See Git-Mastery → Lesson T9L1. Creating Pull Requests
Guidance for the item(s) below:
As your project gets bigger and changes become more frequent, it's natural to look for ways to automate the many steps involved in going from the code you write in the editor to an executable product. This is a good time to start learning about that aspect too.
Build automation tools automate the steps of the build process, usually by means of build scripts.
In a non-trivial project, building a product from its source code can be a complex multistep process. For example, it can include steps such as: pull code from the revision control system, compile, link, run automated tests, automatically update release documents (e.g., build number), package into a distributable, push to repo, deploy to a server, delete temporary files created during building/testing, email developers of the new build, and so on. Furthermore, this build process can be done ‘on demand’, it can be scheduled (e.g., every day at midnight) or it can be triggered by various events (e.g., triggered by a code push to the revision control system).
Some of these build steps such as compiling, linking and packaging, are already automated in most modern IDEs. For example, several steps happen automatically when the ‘build’ button of the IDE is clicked. Some IDEs even allow customization of this build process to some extent.
However, most big projects use specialized build tools to automate complex build processes.
Some popular build tools relevant to Java developers: Gradle, Maven, Apache Ant, GNU Make
Some other build tools: Grunt (JavaScript), Rake (Ruby)
Some build tools also serve as dependency management tools. Modern software projects often depend on third party libraries that evolve constantly. That means developers need to download the correct version of the required libraries and update them regularly. Therefore, dependency management is an important part of build automation. Dependency management tools can automate that aspect of a project.
Maven and Gradle, in addition to managing the build process, can play the role of dependency management tools too.
An extreme application of build automation is called continuous integration (CI) in which integration, building, and testing happens automatically after each code change.
A natural extension of CI is Continuous Deployment (CD) where the changes are not only integrated continuously, but also deployed to end-users at the same time.
Some examples of CI/CD tools: Travis, Jenkins, Appveyor, CircleCI, GitHub Actions
Guidance for the item(s) below:
Next, we have a few more Java topics that you need as you move from a 'programming exercise' mode to a 'production code' mode.
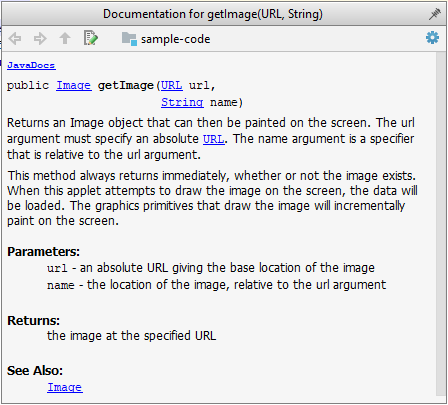
JavaDoc is a tool for generating API documentation in HTML format from comments in the source code. In addition, modern IDEs use JavaDoc comments to generate explanatory tooltips.
An example method header comment in JavaDoc format:
/**
* Returns an Image object that can then be painted on the screen.
* The url argument must specify an absolute {@link URL}. The name
* argument is a specifier that is relative to the url argument.
* <p>
* This method always returns immediately, whether or not the
* image exists. When this applet attempts to draw the image on
* the screen, the data will be loaded. The graphics primitives
* that draw the image will incrementally paint on the screen.
*
* @param url An absolute URL giving the base location of the image.
* @param name The location of the image, relative to the url argument.
* @return The Image at the specified URL.
* @see Image
*/
public Image getImage(URL url, String name) {
try {
return getImage(new URL(url, name));
} catch (MalformedURLException e) {
return null;
}
}
Generated HTML documentation:
Tooltip generated by IntelliJ IDE:

In the absence of more extensive guidelines (e.g., given in a coding standard adopted by your project), you can follow the two examples below in your code.
A minimal JavaDoc comment example for methods:
/**
* Returns lateral location of the specified position.
* If the position is unset, NaN is returned.
*
* @param x X coordinate of position.
* @param y Y coordinate of position.
* @param zone Zone of position.
* @return Lateral location.
* @throws IllegalArgumentException If zone is <= 0.
*/
public double computeLocation(double x, double y, int zone)
throws IllegalArgumentException {
// ...
}
A minimal JavaDoc comment example for classes:
package ...
import ...
/**
* Represents a location in a 2D space. A <code>Point</code> object corresponds to
* a coordinate represented by two integers e.g., <code>3,6</code>
*/
public class Point {
// ...
}
You can use the java.io.File class to represent a file object. It can be used to access properties of the file object.
This code creates a File object to represent a file fruits.txt that exists in the data directory relative to the current working directory and uses that object to print some properties of the file.
import java.io.File;
public class FileClassDemo {
public static void main(String[] args) {
File f = new File("data/fruits.txt");
System.out.println("full path: " + f.getAbsolutePath());
System.out.println("file exists?: " + f.exists());
System.out.println("is Directory?: " + f.isDirectory());
}
}
full path: C:\sample-code\data\fruits.txt
file exists?: true
is Directory?: false
If you use backslash to specify the file path in a Windows computer, you need to use an additional backslash as an escape character because the backslash by itself has a special meaning. e.g., use "data\\fruits.txt", not "data\fruits.txt". Alternatively, you can use forward slash "data/fruits.txt" (even on Windows).
You can read from a file using a Scanner object that uses a File object as the source of data.
This code uses a Scanner object to read (and print) contents of a text file line-by-line:
import java.io.File;
import java.io.FileNotFoundException;
import java.util.Scanner;
public class FileReadingDemo {
private static void printFileContents(String filePath) throws FileNotFoundException {
File f = new File(filePath); // create a File for the given file path
Scanner s = new Scanner(f); // create a Scanner using the File as the source
while (s.hasNext()) {
System.out.println(s.nextLine());
}
}
public static void main(String[] args) {
try {
printFileContents("data/fruits.txt");
} catch (FileNotFoundException e) {
System.out.println("File not found");
}
}
}
i.e., contents of the data/fruits.txt
5 Apples
3 Bananas
6 Cherries
You can use a java.io.FileWriter object to write to a file.
The writeToFile method below uses a FileWriter object to write to a file. The method is being used to write two lines to the file temp/lines.txt.
import java.io.FileWriter;
import java.io.IOException;
public class FileWritingDemo {
private static void writeToFile(String filePath, String textToAdd) throws IOException {
FileWriter fw = new FileWriter(filePath);
fw.write(textToAdd);
fw.close();
}
public static void main(String[] args) {
String file2 = "temp/lines.txt";
try {
writeToFile(file2, "first line" + System.lineSeparator() + "second line");
} catch (IOException e) {
System.out.println("Something went wrong: " + e.getMessage());
}
}
}
Contents of the temp/lines.txt:
first line
second line
Note that you need to call the close() method of the FileWriter object for the writing operation to be completed.
You can create a FileWriter object that appends to the file (instead of overwriting the current content) by specifying an additional boolean parameter to the constructor.
The method below appends to the file rather than overwrites.
private static void appendToFile(String filePath, String textToAppend) throws IOException {
FileWriter fw = new FileWriter(filePath, true); // create a FileWriter in append mode
fw.write(textToAppend);
fw.close();
}
The java.nio.file.Files is a utility class that provides several useful file operations. It relies on the java.nio.file.Paths file to generate Path objects that represent file paths.
This example uses the Files class to copy a file and delete a file.
import java.io.IOException;
import java.nio.file.Files;
import java.nio.file.Paths;
public class FilesClassDemo {
public static void main(String[] args) throws IOException{
Files.copy(Paths.get("data/fruits.txt"), Paths.get("temp/fruits2.txt"));
Files.delete(Paths.get("temp/fruits2.txt"));
}
}
The techniques above are good enough to manipulate simple text files. Note that it is also possible to perform file I/O operations using other classes.
You can organize your types (i.e., classes, interfaces, enumerations, etc.) into packages for easier management (among other benefits).
To create a package, you put a package statement at the very top of every source file in that package. The package statement must be the first line in the source file and there can be no more than one package statement in each source file. Furthermore, the package of a type should match the folder path of the source file. Similarly, the compiler will put the .class files in a folder structure that matches the package names.
The Formatter class below (in <source folder>/seedu/tojava/util/Formatter.java file) is in the package seedu.tojava.util. When it is compiled, the Formatter.class file will be in the location <compiler output folder>/seedu/tojava/util:
package seedu.tojava.util;
public class Formatter {
public static final String PREFIX = ">>";
public static String format(String s){
return PREFIX + s;
}
}
Package names are written in all lower case (not camelCase), using the dot as a separator. Packages in the Java language itself begin with java. or javax. Companies use their reversed Internet domain name to begin their package names.
For example, com.foobar.doohickey.util can be the name of a package created by a company with a domain name foobar.com
To use a public from outside its package, you must do one of the following:
The Main class below has two import statements:
import seedu.tojava.util.StringParser: imports the class StringParser in the seedu.tojava.util packageimport seedu.tojava.frontend.*: imports all the classes in the seedu.tojava.frontend packagepackage seedu.tojava;
import seedu.tojava.util.StringParser;
import seedu.tojava.frontend.*;
public class Main {
public static void main(String[] args) {
// Using the fully qualified name to access the Processor class
String status = seedu.tojava.logic.Processor.getStatus();
// Using the StringParser previously imported
StringParser sp = new StringParser();
// Using classes from the tojava.frontend package
Ui ui = new Ui();
Message m = new Message();
}
}
Note how the class can still use the Processor without importing it first, by using its fully qualified name seedu.tojava.logic.Processor
Importing a package does not import its sub-packages, as packages do not behave as hierarchies despite appearances.
import seedu.tojava.frontend.* does not import the classes in the sub-package seedu.tojava.frontend.widget.
If you do not use a package statement, your type doesn't have a package -- a practice not recommended (except for small code examples) as it is not possible for a type in a package to import a type that is not in a package.
Optionally, a static import can be used to import static members of a type so that the imported members can be used without specifying the type name.
The class below uses static imports to import the constant PREFIX and the method format() from the seedu.tojava.util.Formatter class.
import static seedu.tojava.util.Formatter.PREFIX;
import static seedu.tojava.util.Formatter.format;
public class Main {
public static void main(String[] args) {
String formatted = format("Hello");
boolean isFormatted = formatted.startsWith(PREFIX);
System.out.println(formatted);
}
}
Formatter class
Note how the class can use PREFIX and format() (instead of Formatter.PREFIX and Formatter.format()).
When using the command line to compile/run Java, you should take the package into account.
If the seedu.tojava.Main class is defined in the file Main.java,
<source folder>, the command is:javac seedu/tojava/Main.java<compiler output folder>, the command is:java seedu.tojava.MainAccess level modifiers determine whether other classes can use a particular field or invoke a particular method.
There are two levels of access control:
At the class level:
public: the class is visible to all classes everywhereAt the member level:
public or no modifier (package-private): same meaning as when used with top-level classesprivate: the member can only be accessed in its own classprotected: the member can only be accessed within its own package (as with package-private) and, in addition, by a subclass of its class in another packageThe following table shows the access to members permitted by each modifier.
| Modifier | ||||
|---|---|---|---|---|
public | ||||
protected | ||||
| no modifier | ||||
private |
Access levels affect you in two ways:
Java applications are typically delivered as JAR (short for Java Archive) files. A JAR contains Java classes and other resources (icons, media files, etc.).
An executable JAR file can be launched using the java -jar command e.g., java -jar foo.jar launches the foo.jar file.
The IDE or build tools such as Gradle can help you to package your application as a JAR file.
See the tutorial Working with JAR files @se-edu/guides to learn how to create and use JAR files.
Guidance for the item(s) below:
As you know, one of the objectives of the iP is to raise the quality of your code. We'll be learning about various ways to improve the code quality in the next few weeks, starting with coding standards.
Guidance for the item(s) below:
In-video quizzes
The Q+ icon indicates that the video has an in-video quiz. Submitting the in-video quiz can earn you bonus participation marks.
In-video quizzes are in only a small number of pre-recorded videos that are more important than the rest. They are a very light way to engage you with the video a bit more than just passively watching.
Please watch the video given below as it has some extra points not given in the text version.
Always code as if the person who ends up maintaining your code will be a violent psychopath who knows where you live. -- Martin Golding
Production code needs to be of high quality. Given how the world is becoming increasingly dependent on software, poor quality code is something no one can afford to tolerate.
One essential way to improve code quality is to follow a consistent style. That is why software engineers usually follow a strict coding standard (aka style guide).
The aim of a coding standard is to make the entire codebase look like it was written by one person. A coding standard is usually specific to a programming language and specifies guidelines such as the locations of opening and closing braces, indentation styles and naming styles (e.g., whether to use Hungarian style, Pascal casing, Camel casing, etc.). It is important that the whole team/company uses the same coding standard and that the standard is generally not inconsistent with typical industry practices. If a company's coding standard is very different from what is typically used in the industry, new recruits will take longer to get used to the company's coding style.
IDEs can help to enforce some parts of a coding standard e.g., indentation rules.
Guidance for the item(s) below:
As promised last week, let's learn some more sophisticated ways of testing.
Delaying testing until the full product is complete has a number of disadvantages:
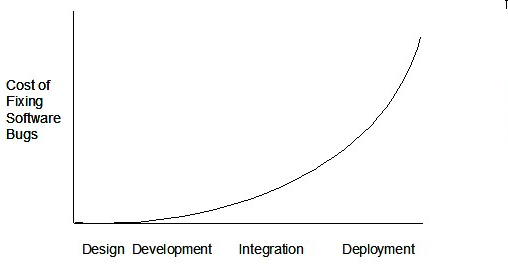
Therefore, it is better to do early testing, as hinted by the popular rule of thumb given below, also illustrated by the graph below it.
The earlier a bug is found, the easier and cheaper to have it fixed.
Such early testing software is usually, and often by necessity, done by the developers themselves i.e., developer testing.
A test driver is the code that ‘drives’ the for the purpose of testing i.e., invoking the SUT with test inputs and verifying if the behavior is as expected.
PayrollTest ‘drives’ the Payroll class by sending it test inputs and verifies if the output is as expected.
public class PayrollTest {
public static void main(String[] args) throws Exception {
// test setup
Payroll p = new Payroll();
// test case 1
p.setEmployees(new String[]{"E001", "E002"});
// automatically verify the response
if (p.totalSalary() != 6400) {
throw new Error("case 1 failed ");
}
// test case 2
p.setEmployees(new String[]{"E001"});
if (p.totalSalary() != 2300) {
throw new Error("case 2 failed ");
}
// more tests...
System.out.println("All tests passed");
}
}
JUnit is a tool for automated testing of Java programs. Similar tools are available for other languages and for automating different types of testing.
This is an automated test for a Payroll class, written using JUnit libraries.
// other test methods
@Test
public void testTotalSalary() {
Payroll p = new Payroll();
// test case 1
p.setEmployees(new String[]{"E001", "E002"});
assertEquals(6400, p.totalSalary());
// test case 2
p.setEmployees(new String[]{"E001"});
assertEquals(2300, p.totalSalary());
// more tests...
}
Most modern IDEs have integrated support for testing tools. The figure below shows the JUnit output when running some JUnit tests using the Eclipse IDE.
Unit testing: testing individual units (methods, classes, subsystems, ...) to ensure each piece works correctly.
In OOP code, it is common to write one or more unit tests for each public method of a class.
Here are the code skeletons for a Foo class containing two methods and a FooTest class that contains unit tests for those two methods.
class Foo {
String read() {
// ...
}
void write(String input) {
// ...
}
}
class FooTest {
@Test
void read() {
// a unit test for Foo#read() method
}
@Test
void write_emptyInput_exceptionThrown() {
// a unit tests for Foo#write(String) method
}
@Test
void write_normalInput_writtenCorrectly() {
// another unit tests for Foo#write(String) method
}
}
import unittest
class Foo:
def read(self):
# ...
def write(self, input):
# ...
class FooTest(unittest.TestCase):
def test_read(self):
# a unit test for read() method
def test_write_emptyIntput_ignored(self):
# a unit test for write(string) method
def test_write_normalInput_writtenCorrectly(self):
# another unit test for write(string) method
When writing JUnit tests for a class Foo, the common practice is to create a FooTest class, which will contain various test methods for testing methods of the Foo class.
Suppose we want to write tests for the IntPair class below.
public class IntPair {
int first;
int second;
public IntPair(int first, int second) {
this.first = first;
this.second = second;
}
/**
* Returns The result of applying integer division first/second.
* @throws Exception if second is 0.
*/
public int intDivision() throws Exception {
if (second == 0){
throw new Exception("Divisor is zero");
}
return first/second;
}
@Override
public String toString() {
return first + "," + second;
}
}
Here's a IntPairTest class to match (using JUnit 5).
import org.junit.jupiter.api.Test;
import static org.junit.jupiter.api.Assertions.assertEquals;
import static org.junit.jupiter.api.Assertions.fail;
public class IntPairTest {
@Test
public void intDivision_nonZeroDivisor_success() throws Exception {
// normal division results in an integer answer 2
assertEquals(2, new IntPair(4, 2).intDivision());
// normal division results in a decimal answer 1.9
assertEquals(1, new IntPair(19, 10).intDivision());
// dividend is zero but divisor is not
assertEquals(0, new IntPair(0, 5).intDivision());
}
@Test
public void intDivision_zeroDivisor_exceptionThrown() {
try {
assertEquals(0, new IntPair(1, 0).intDivision());
fail(); // the test should not reach this line
} catch (Exception e) {
assertEquals("Divisor is zero", e.getMessage());
}
}
@Test
public void testStringConversion() {
assertEquals("4,7", new IntPair(4, 7).toString());
}
}
@Test annotation.assertEquals(expected, actual) methods (provided by JUnit) to compare the expected output with the actual output. If they do not match, the test will fail.assertNull, assertNotNull, assertTrue, assertFalse etc. [more ...]testStringConversion but when writing test methods, sometimes another convention is used:unitBeingTested_descriptionOfTestInputs_expectedOutcomeintDivision_zeroDivisor_exceptionThrowncatch block. But if it is not thrown as expected, the test will reach fail() line and will fail as a result.What to test for when writing tests? While test case design techniques is a separate topic altogether, it should be noted that the goal of these tests is to catch bugs in the code. Therefore, test using inputs that can trigger a potentially buggy path in the code. Another way to approach this is, to write tests such that if a future developer modified the method to unintentionally introduce a bug into it, at least one of the test should fail (thus alerting that developer to the mistake immediately).
In the example above, the IntPairTest class tests the IntPair#intDivision(int, int) method using several inputs, some even seemingly attempting to 'trick' the method into producing a wrong result. If the method still produces the correct output for such 'tricky' inputs (as well as 'normal' outputs), we can have a higher confidence on the method being correctly implemented.
However, also note that the current test cases do not (but probably should) test for the inputs (0, 0), to confirm that it throws the expected exception.
A proper unit test requires the unit to be tested in isolation so that bugs in the cannot influence the test i.e., bugs outside of the unit should not affect the unit tests.
If a Logic class depends on a Storage class, unit testing the Logic class requires isolating the Logic class from the Storage class.
Stubs can isolate the from its dependencies.
Stub: A stub has the same interface as the component it replaces, but its implementation is so simple that it is unlikely to have any bugs. It mimics the responses of the component, but only for a limited set of predetermined inputs. That is, it does not know how to respond to any other inputs. Typically, these mimicked responses are hard-coded in the stub rather than computed or retrieved from elsewhere, e.g., from a database.
Consider the code below:
class Logic {
Storage s;
Logic(Storage s) {
this.s = s;
}
String getName(int index) {
return "Name: " + s.getName(index);
}
}
interface Storage {
String getName(int index);
}
class DatabaseStorage implements Storage {
@Override
public String getName(int index) {
return readValueFromDatabase(index);
}
private String readValueFromDatabase(int index) {
// retrieve name from the database
}
}
Normally, you would use the Logic class as follows (note how the Logic object depends on a DatabaseStorage object to perform the getName() operation):
Logic logic = new Logic(new DatabaseStorage());
String name = logic.getName(23);
You can test it like this:
@Test
void getName() {
Logic logic = new Logic(new DatabaseStorage());
assertEquals("Name: John", logic.getName(5));
}
However, this logic object being tested is making use of a DataBaseStorage object which means a bug in the DatabaseStorage class can affect the test. Therefore, this test is not testing Logic in isolation from its dependencies and hence it is not a pure unit test.
Here is a stub class you can use in place of DatabaseStorage:
class StorageStub implements Storage {
@Override
public String getName(int index) {
if (index == 5) {
return "Adam";
} else {
throw new UnsupportedOperationException();
}
}
}
Note how the StorageStub has the same interface as DatabaseStorage, but is so simple that it is unlikely to contain bugs, and is pre-configured to respond with a hard-coded response, presumably, the correct response DatabaseStorage is expected to return for the given test input.
Here is how you can use the stub to write a unit test. This test is not affected by any bugs in the DatabaseStorage class and hence is a pure unit test.
@Test
void getName() {
Logic logic = new Logic(new StorageStub());
assertEquals("Name: Adam", logic.getName(5));
}
In addition to Stubs, there are other type of replacements you can use during testing, e.g., Mocks, Fakes, Dummies, Spies.
Guidance for the item(s) below:
While the JUnit concepts mentioned in the topic below are not strictly needed for the course projects, it is good to be aware of them so that you try some of them when applicable.